
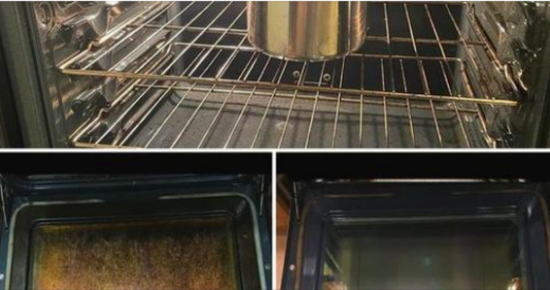
Although it may not be the most pleasant chore, cleaning your oven is nonetheless essential. Not only does a dirty oven appear bad, but as leftover food burns to a crisp, it can also emit disagreeable smells.
Additionally, there’s a chance that the charred flavor will seep into your food. Furthermore, it’s challenging to ensure evenly cooked food when your oven is unclean. Furthermore, cleaning gets harder if you put it off.
To avoid a buildup of dirt, experts advise thoroughly cleaning your oven every three to six months. Don’t worry, though, if you’ve overlooked it for a longer period of time or are handling a particularly difficult situation. There are efficient ways to restore the original appearance of your oven’s racks, doors, and knobs.
These are five tried-and-true ways to clean your oven:
First Method:
The option to self-clean This is probably the easiest method for cleaning your oven because it doesn’t involve using any harsh chemicals or labor-intensive scrubbing. Paul Bristow, GE Appliances’ executive director of built-in cookery, thinks the self-clean cycle is a useful time-saving function. “The oven reaches a temperature of roughly 880 degrees Fahrenheit throughout the cleaning procedure. Food within the oven burns at this temperature, leaving behind a small amount of ash. A moist cloth can be used to readily remove any remaining ash. Just remember to wait for the oven to cool down before doing any interior cleaning.
Nevertheless, there are drawbacks to employing the self-clean cycle. It can also elevate the temperature in your kitchen, which could be uncomfortable in the summer, and it locks the oven for three to five hours. It can also emit an unpleasant odor, so it’s a good idea to tidy up while the cycle is operating. The main disadvantage is that stubborn stains and grease could not entirely come out. It may be necessary to repeat the cycle or apply some traditional elbow grease to stubborn areas.
Method 2: Oven cleaner from the store
You may just pick up a professional oven cleaner from the shop for this technique. First, take out any large food fragments or loose ash. Next, mist the oven with the cleaning solution. Give it a half hour or so to sit before removing it. Open windows, wear gloves and a face mask, and take precautions against harsh cleaning agents like these.
Method 3: baking soda along with vinegar
You may make your own cleaning solution using vinegar, baking soda, and water if you’d rather not use harsh chemicals or if you just don’t want to go out and buy them. The Maids’ director of national branding, Jessica Samson, states that “the water helps soften and loosen up any stubborn food particles while the baking soda acts like a gentle scrub.” Create a paste and liberally apply it to the oven’s internal surfaces. Give it a minimum of 20 minutes (better yet, longer) to allow any burned food to break down.
Apply a little vinegar to the baking soda paste and let it sit for an additional 20 minutes to get even more cleaning power. After that, use non-abrasive pads to scrape the oven, and then wipe it down.
Method 4: Lemons and baking soda
You can use half a cup of citric acid or two large lemons for this procedure. To ensure that baking soda is distributed evenly, start by dusting it all over the inside of the oven. Then, give it a quick clean down with water. Give it ten minutes or so to sit. Next, combine the citric acid or the juice from the two lemons with a bucket of warm water. Wash the baking soda away with this mixture. After cleaning, give the oven one last spray with the lemon water to leave a nice, citrusy smell.
Technique 5: Steaming
An equally simple do-it-yourself substitute for utilizing a self-clean cycle is steaming. Kris Koenig, CEO of Natura Clean, suggests “putting a pan of water in the oven and setting it to 225 degrees Fahrenheit for at least 15 minutes.” After it has slightly cooled, add some dish soap to the water pan. Next, scrub the entire inside of the oven and the released dirt using this soapy water and a nylon sponge or non-scratch wool pad.
ADDITIONAL Oven Cleaning Advice:
- Always make sure the oven is totally off and cooled down before beginning any cleaning.
- Wearing rubber gloves and protective clothing is a good idea when using strong cleaning agents, especially if the chemicals are harsh.
- Before using the cleaner, manually remove any large bits of dirt or food residue.
- A toothbrush comes in pretty handy for areas that are difficult to reach, such as corners and crevices.
- If the grease buildup is particularly bad, consider using a baking soda and vinegar mixture. After leaving it overnight, use a sponge to remove it.
HOUSEHOLD RACK CLEANING:
You should clean the metal racks separately from the oven, regardless of the method you use. Remove from the container and immerse in a hot water and dishwasher soap solution. Large sinks, basins, and even bathtubs are available for usage. Utilizing steel wool or a stiff brush, thoroughly clean the racks after approximately two hours. After washing and drying, place them back in your oven that has just been cleaned. Reminder: steel wool should only be used on the racks; do not use it on the interior of the oven as this could harm the porcelain or steel finishes.
HOW TO CLEAN KITCHEN KNOBS:
Lightly wipe off the knobs with a moist microfiber towel. Add a little soap if required. Use the towel to spray rather than directly on them. Mr. Appliance President Ron Shimek cautions, “The liquid could seep behind the knobs and switches, potentially causing a short in the control panel.” “In order to avoid any shorts, use a rag and cleaner to clean the controls.”
GLASS OVEN DOORS CLEANING TIPS:
Mix 3 tablespoons dish soap and ½ cup baking soda to make a paste. Let it sit for at least thirty minutes after spreading it on the inside glass of the oven door. After the dirt is easily removed, remove the paste with a non-abrasive sponge. Use a non-abrasive sponge and white vinegar or glass cleaner to clean the outside glass. Use a moist cloth to rinse. Take care not to scratch the glass surface with scouring pads or aggressive scrubbers.


Leave a Comment